 |
|
Lakes/Slithzerikai |
| hostile |
Navigation: General Hints, Notes
List of all towns and shops in Avernum
 |
 |
 |
| Crypt of Drath | Hall of Tombs and Underground Lake | Drath's Lair and Portals |
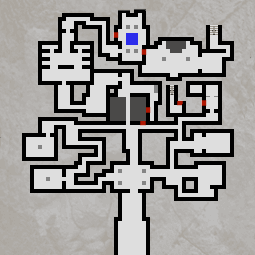
This is a complex dungeon on three levels with lots of undead. At the entrance is a locked door which you cannot open, but that does not matter because the wall next to it has fallen down.
Just inside are the fiirst undead – some Revenants. There are five crypts in the first part of the cave. In the SW corner three Banshees are guarding a sarcophagus containing a Gold Bar, a Scroll – Spineshield and a Fine Robe. Just north of this chamber is another crypt this time guarded by three Vengeful Shades. Inside this sarcophagus are a few coins.
In the SE are two gazers. This time the tomb contains an emerald. The crypt north of this one is also open and here are four Draining Slimes. In each of the sarcophagi in this crypt is a parchment that tells you this cave was built for someone named Drath and that the writers of the parchment found a marble key which they were taking with them to meet up with some people near the Cave of Motrax. This key is probably the Stone Key you (hopfully) found on the battlefield there. Further north is a locked crypt with a vampire, four Draining Slimes and a Writhing Mass. The sarcophagus has a nice lot of jewlery.
Directly north of the entrance is a bridge over a chasm with a trapped section in the middle. If your Tool Use is high enough you can avoid the trap and pass over the bridge. Alternatively you can search the north wall of the corridor to the east and find a secret passage which bypasses the bridge and leads to a gate which can be opened with the stone (marble) key. Six or seven undead are behind this gate. After you have disposed of them you come to another locked door to a moturary which is guarded by a few undead. There are a few items such as rubies and spirtual herbs just lying around. The corpses have very little. There ar two font-like basins behind magical barriers (L1). The eastern one causes three undead to appear while the pool in the west gives you about 70xp.
Round the corner is a locked door to an eerie temple with a few assorted undead. In the SE corner is a hidden door to a dark cave with two golems and a cryos demon. When you have killed them you can go down to the next level.
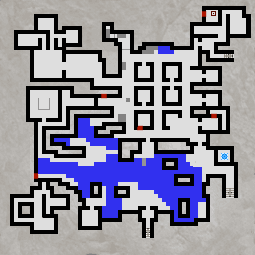
Down the stairs is a landing stage by a lake and a locked portcullis to the north. A portal is visible through the window of a small room with no apparent doors. There is a corpse lying by the lakeside. All that it has on it is a journal which tells you a bit about the fate of the Demonslayer. There are also two leavers here, both of which should be pulled. The northern one opens the portcullis.
The first room you come to in the north is the Hall of Tombs. There a two rows of tombs in the centre and three tombs along the east wall, arranged as follows:-
|
|
|
|||
|
|
|
|||
|
|
|
Each of these tombs has a (usually locked) door, a sarcophagus and in most cases a guard. The following list gives: state of the door (alternative way in); guard; treasure in the sarcophagus [further notes]:-
At the end of the central side passage to the west is a hidden door leading to a further crypt guarded by an Honoured Dead, two Cave Demons and three Ruby Skeletons. The Honoured Dead drops some Spectral Boots and the Ruby Skeletons occasionally a Ruby. The sarcophagus is empty.
In the NW corner of the Hall of Tombs is a ledge which I have never managed to get onto. South of the ledge is a passage leading to a corridor with a golem. Once past it you come into the Smoky Laboratory. In the south is a container which is rather hard to see but contains an Energy elixir. There is a tome in the NE corner which does nothing except slow you and call up a Mung Demon and three Vengeful Shades if you read it. They do however drop an Invulnerability Elixir. To the north are two magical barriers (the western one needs Dispel Barriers L2). Behind each of them is a chamber with a Rampaging Infernal. To the east of the eastern chamber is a lever which you should pull.
To the south of the Hall of Tombs is a gate which should now be open and leads to a landing stage where a boat is moored. Rowing across the lake to the SW brings you to a bank with a hidden passage guarded by two Skeletal Warriors. After disposing them you should pull the lever.
Back on the lake is a further place a little to the east (i.e. west of centre) were you can land. Behind a locked door are six Quickghasts guarding two chests which contain some coins, an Energy Elixir, an Arenea Fang and a few other items. In the SE corner of the lake is a bank with nothing but some energetic herbs.
The south bank of the lake in the middle is quite deserted. If you have pulled all the levers the gate is wide open and you can go through it down to level 3.
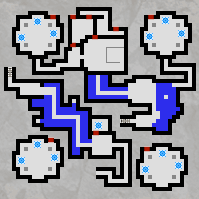
At the end of a twisting path through an underground canal you come across four Cave Demons. Further on to the east and then south you find a path which leads to three magical barriers (L1, L2 and then L3). If you manage to dispel all the barriers, you find the path leads to a dead-end! So back to the chamber where the demons greeted you. There you can find a hidden door in then north wall leading to a teleporter. Since there are so many portals on this level I have given them names. As this is the first one I have named it GO. This one takes you to the NE Portal Chamber.
On this level there are lots of portals that take you around. There are four Portal Chambers which all look alike, so it is often difficult to know exactly where you are. The trouble is that as soon as you step into the first portal, the light fails and you cannot orient yourself at all. The trick is always to take the eastern portal in a chamber, but always have a look around for buttons and hidden doors. The destinations of the teleporters in the four chambers:
| NW Portal Chamber | NE Portal Chamber | SW Portal Chamber | SE Portal Chamber | |
| West: | to SE | back to here (NE) | to NE | to NE |
| North: | to SW | to SE | to SE | back to GO |
| East: | back to here (NW) | to SE | to NW | to SW |
Two golems tend to appear randomly in the various chambers. When you finally reach the NW Portal Chamber you find you can get no further with teleporters. This is the end of your teleporting between the Portal Chambers. There is a secret exit in the south which takes you at last to the Chambers of Drath .
Before reaching his chamber you receive a warning. Before passing through the gate to the east and entering Drath's Chamber it is better to explore a bit. There is a secret door to the north where two tomes are lying on pedestals. You can read the right one which teaches Ward of Thoughts L3. The tome on the left is the spellbook which Thantria, Rita and Kyass covet. You can read it while it is still on the pedestal. This will give you the trait "Drath's Knowledge" (bonus of 1% to all spells, need 1 less Arcane Lore to use spell tomes). After reading it the pages appear blank. You can however take the tome and give it to one of the persons wanting it.
[N.b: On reading the Spiderweb forum for AEP I note that there was a glitch with this tome in the original version of the game. I bought the game for Windows in April 2012 and updated with Avernum Remix Version 1.1, which is what I describe in these notes. I have only done one rather quick walkthrough with the original version. So I cannot identify any discrepancies.]
Further to the north is a secret door leading to a passage going east and then south where the way is blocked by a barrier behind which are two basins from which you can drink. The northern one gives you the ability Regenerating for 14 turns and the other Invulnerability (80%) for 10 turns. These will help a lot particularly if you open the secret door in the SW and attack Drath from the north. It is a tough fight but when you finally kill him, you find a Robe of Magi and a Rod of Alacrity.
In the South wall of Drath's Chamber is a secret paasage which can be opened in combat by a button on the north wall thus giving you an escape route if you want. It opens up automatically when Drath dies and leads to a Crypt. In the sarcophagus is the tip of the Demonslayer. Assuming you have already picked up the Pommel in the Underground Nephilim Fort and the Blade in the Slith Temple, you now have all parts and can ask Boutell in Fort Draco to repair it.
But first you need to get out of this dungeon. There is a staicase just south of the crypt which takes you into a closed room in the NE of level 2. Once you have found the button to get you out of this room you could use the wheel to open the portcullis to the Hall of Tombs, but it is much easier to take the staircase to level 1 where you can find a secret door that lets you out into the main part.
If you really wanted to, you could, instead of taking the staircse to the south of Drath's Crypt, go back to the NW portal chamber and use the portals to get back to GO. After winding your way back up to the 2nd level you can get into your boat and row back to the landing stage on the north bank of the lake, only to find the gate locked. You can however sail to the east and use the staircase there to get up to the ground floor and work your way back through the eerie temple and the mortuary bypassing the bridge back to the entrance.
There are lots of secret doors and even more buttons on this level.
So your best strategy when you are using the portals in the dark is to go to the north and press the button. If it opens a path take it. If it is the wrong path or no passage appears, use the eastern portal to take you to the next chamber.
If you return to this dungeon later you can get through much more easily. The route through the first level is the same, but when you get to the second level you find that the the portal in the SE is now accessible. This takes you directly to the staircase across the lake so that you can go diectly down to the 3rd level without having to mess about with any more complicated levers. The light no longer fails when you use the portals on the lowest level but pairs of golems still appear randomly in the portal chambers.
