 |
|
Giant Lands |
| hostile |
Navigation: General Hints, Notes
List of all towns and shops in Avernum
 |
 |
| Giant Castle | Dungeons |
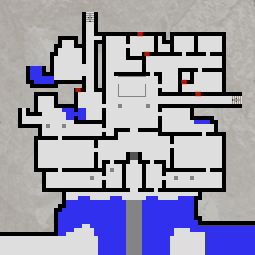
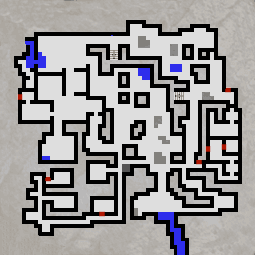
The only way into this castle is through the main gate. Instead of being attacked by hordes of giants you find that there is a trapped floor which plummets you into a prison cell in the dungeons. To get out you need to find the key to the gates (which also fits the gate to the landing stage on the Northern Waters). The giants have naturally amassed lots of treasure. In the hidden passages and rooms are some nice goodies and also two prisoners who can help you.
| Person | Function | Notes |
| Zed | Human Prisoner | He waffles a bit about Pyrog and if you have not already done so he will tell you to ask Calder in Bargha about the Scimitar. If you ask him about escaping from the castle he tells you to talk to the other prisoner Hrethra. Once you have opened the gate to the castle, you can tell him that he can escape and you get around 20xp and 1 reputation. |
| Hrethra | Nephilim Prisoner | He is a member of the Split-Tail Clan, some of whom you have already slain in battles. As enemies of the giants however you can strike up a truce with him for the time being. He will tell you about the key to the gate and where to find it and also about part of a sword in a crypt in a cave to the north of Cotra. When you inform him that the path is free to escape you gain about 20xp. |
You have two choices here:-
I prefer to clear out the cave, but I will first describe the quick way.
There is a hidden door on the west of the cell you get dumped into. Follow the path where it leads: S, E, and N until you are more or less in the centre of the dungeons. Here you will meet a variety of ogres. Having eliminated them you should go west past some wooden logs to a door in the north wall, where the sign says: BOAT MASTUR HALL. Prepare for battle (Heal, Haste and Bless) enter combat mode and go through the door into the Boatmaster's Hall. Here you will meet Boatmaster Wurga and some of his cronies. Since the doors to the north are open, you should make sure that you have removed all opposition After killing them go through the door near the south end of the west wall into the Boatmaster's Room. In the north is a door to a storeroom with a chest containing a large Tin Key, which you should take. You can pick up a bit of loot here if you want and then go back to the boatmaster's hall.
Form here north to a storeroom. In the NE corner you come to some passages leading to the stairs to the ground floor. You will pass a side cave with a lizard pen guarded by two goblins. You will have to kill them before you can go south to the smithy where you can kill the giant smith Grakka.
Now you must find the secret door to the stone quarry in the south. Here you should take the door in the middle of the south wall and NOT the one in the SE corner which leads to the main hall. There are a few giants in the small barrack. Then east to the main gate where a few more giants are waiting. You cannot get out through the main gate because of the gaping hole left by the trap you fell through. The door in the south just east of this pit leads to a guardroom with a wheel which you can unlock with the tin key you found downstairs. Turning the wheel opens gates to the south, so that you can escape. Now you have a key which also opens the gate to the Northern Waters.
With a strength of at least 30 you can open the gate without the key. Althought you can escape from the castle, you still cannot open the gate at I on the map without the key.
After being dumped into the prison cell you can explore a bit. The only way out is to the west and then south. Directly south of your cell is another cell, which is empty. Further south and around the corner to the east you hear voices. Near the end of the passageway is a hidden door to a third cell where Zed and Hrethra are hiding. After talking to them I like to explore the dungeons.
In the caves and passages of the dungeons there are some ogres in the middle andcave slimes and giant lizards to the NE and also some cave slimes in the SE. In the west of the dungeons is the boatmaster and in the east a Demon Hideout.
In the main hall are Boatmaster Wurga and various giants. Since the doors are open other giants come in to help. To the south of the hall is the torture chamber.
There is quite a lot of loot in these rooms and I will only mention the more important items. Wurga drops a Tarnished Chain (value 1500) which provides some good protection without any penalties. To the west of the main hall is the boatmaster's bedroom. In the dresser are a few coins and potions. To the north is a room with a chest containing a tin key. Further north is a secret passage blocked by a magic barrier which needs Dispel Barriers L3 but leads to a Wisdom Crystal and a Corrupting Baton. None of the bodies in the storage room in the NW corner of this level has anything other than clothes, and most of the crates and barrels contain uninteresting items. One crate in the north however contains some potion ingredients.
There are two entrances to the demon area: from the north through a hidden door in the southern wall of a cave to the NE and through a hidden door at the end of what looks like a cul-de-sac in the SE of the dungeons. The southern entrance is blocked by magical barriers and a locked door. Then you come to a room with a chest guarded by three Specters. The chest contains some coins, Mandrake and an Armour Elixir. To the east is a hidden room with some goodies. North of this room is another hidden door to a room with a demon. The demon drops a Runed Helm. There is a tome in the NW corner of this room which tells you a bit about demons and mentions Adze-Haakai.
The entrance from the north comes directly onto the demon but you cannot get further south by this route.
There are two staircases up to the ground floor: 1. just east of the storage room – leads to the smithy in the middle, 2. in the east, just west of the northern entrance to the Demon Hideout – leads into the main Hall.
If you wanted to, you could sneak out now. The way through the smithy and the guardroom to the east of the main gate, where the tin key unlocks the wheel which opens the gate, is described above.
It is however much more fun to clear the castle out. Overseer Fnargh, whom Kyass wants you to eliminate is in the Feasting Hall. Whenever you get near the hall you will be advised, that "a lot of the creatures wait within, ready to do battle with you and that confronting such a crowd might be unwise". Be that as it may, if you want to kill the boss, you must enter. I prefer not to barge straight into the hall but take a detour and approach from the north.
I go up the staircase in the east of the dungeons. This comes out in a long corridor leading to the hall. In the north wall is a secret door to the workshop of the Incantor Urama. who is waitng for you together with a Cave Giant and an Overseer. They drop some nice items including a Wisdom Crystal. Now you can explore the alcove to the west where you can find a secret door to the north leading to a chest containing some coins and an Oozing Wand.
To the north of the workshop is the kitchen where a Cave Giant and two Goblins are working. East of the kitchen are the sleeping quarters. In the northeast are two unoccupied bedrooms with a few items in the dressers. In the NW corner of the kitchen is a secret door to a laboratory where you can pick up a few potion ingredients and find a further secret door to the east. Here is a treasure chest which holds some coins and two Gold Bars.
To the west of the laboratory is the temple where Shaman Putha officiates. He goes off in the direction of the feasting hall but as long as you keep in the temple the occupants of the feasting hall will come out to fight you. This way you can deal with them piecemeal. If you are lucky Putha comes back and various Cave Giants and Mutant Lizards attack you. When Lady Hrrub has come round the corner and no further enemies are evident you can go round the corner into the hall.
The giant chief, Overseer Fnargh, on the dais. If you were to come straight into the hall through one of the doors you would be confronted by many oppenents. As it is you can concentrate on the boss who is very tough, but casts no spells, so you just have to pummel him until he drops dead.
To the west of the feasting hall is the smithy (one giant) with afew bars (one gold).. North of the smithy is a passage leading down to the dungeons. To the west of this passage is a lizard pen with three giant lizards guarded by two goblins. They drop nothing and the bodies lying around have nothing on them.
South (and west) of the smithy is a quary with a few chestswhich contain a few items which are worth having. South of this is a barrack (3 Cave Giants and a Giant Lizard) with a bit of loot. South of this is another lizard pen (2 Mutant Lizards) but no treasure.
To the east of the feasting hall is storage room with nine chests containing rather mundane stuff. There is nothing lying around but in the chest is a Bronze Halberd and in the heap hidden in the NE corner are two Gold Bars. South of this are giants quarters (a Cave Giant, a Diviner and a Slinger). There are a few items in the cupboards here. To the south is an empty animal pen but no goodies. West of this room is the eastern guardhouse with a wheel which can be unlocked with the tin key in order to open the gates.
At this piont you can slip down to the dungeons and tell Zed and Hrethra that they can now escape (20+20xp and 1 reputation). Now off to Freehold of Kyassto sell your loot and collect your reward for killing Overseer Fnargh.
There are so many secret buttons in this dungeon, that I have decided to divide them up a bit
