 |
|
Bad Lands |
| hostile |
Navigation: General Hints, Notes
List of all towns and shops in Avernum
 |
| The Tower of Grah-Hoth |
You have received enough hints about where Grah-Hoths's seat is (e.g. Nizzrek or Astar). You need a key which you can either find outdoors at Q on the Worldmap or near the main entrance.
Reaching Grah-Hoth himself is rather complicated. You soon find out that, like Astar, not all of Grah-Hoth's servants are happy with their master and are therefore not always quite loyal to him. You need to talk to various creatures that will help you.
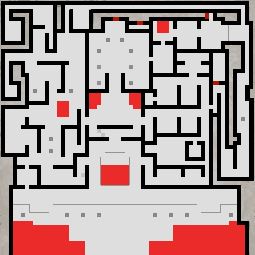
It is always a good idea to explore the outside of a building or town before entering it. Here in the forcourt are a Purging Crystal and a Healing Elixir to be found. Before you climb the short flight of stairs and enter the building you must make sure that you have a black iron key, which you can get in two ways.
Before flying over the chasm to Grah-Hoth's Fortress you can expore the lava filled cave. Towards the SW corner of this cave is a secret passage leading west with a further secret passage leading south (see the Map of the Bad Lands).
After climbing the stairs in front of the fort you can go along the outside wall to a pit with the very powerful Haakai, Hellscythe Flensa, who is supported by demons and several undead. When you kill the Haakai he drops a Black Iron Key.
There is a portcullis at the western end of the outside wall which the black key opens. Inside you find a lot of imps who are working rather unwillingly on restoring the Castle. If you talk to them they tell you to speak to Tyoarik, who is hiding in the NW corner of the fortress. He tells you about a fragile wall in a storeroom to the east.
Following his instructions you find the storeroom to the north and tear down the wall in the east. If you come across a hammer, it is not a bad idea to take it with you. Then go along the passage along the north end of the fortress. Round the corner is a passage leading south where you will be waylaid by various slimes and undead. At the southern end the passage turns north and you come to a dead end. The wall to the SW looks rather weak but if you have no hammer you cannot tear it down.
There is a button in the NW corner of this dead end which opens a path to a small room with a cupboard containing a hammer. With the help of the hammer you can tear down a wall back to the south.
On tearing the wall down you find yourself in the chambers of Grah Hoth's demons. There are lots of Demonic Reavers around, backed up by Mutant lizards. In the area to the south is an Infernal Torturer, which is a bit tough. These chambers are their sleeping quarters and their nests often have useful treasuresa. The torturer for instance drops a Farsight Band (+6% to missile damage, worth 2000 coins)
If you just want to do Grah Hoth in, you can leave most of the demons and their minor treasures and go directly west to a magical barrier level 1 which, when dispelled, lets you into the central tract where everything is suspiciously quiet.
But not for long. As you proceed north up the corridor of the hall you reach a magic circle near the end where the walls disappear and you face the nasty lord of this tower. For this fight you can pull out all the stops: Haste, War Blessing, Invulnerability Potions or Elixirs and other potions etc. Grah Hoth keeps on summoning monsters to help him. These should be removed as soon as possible otherwise they will overwhelm you. You need however to kill Grah Hoth who drops a Blessed Amour Band worth 2000 coins.
Now you have killed the demon lord you can loot his treasury. The treasure chamber is to east and needs a few hidden buttons to open the way. There is a dining room to the east of the main hall which is protected by magical barriers. The one to the west (i.e. in the east of the main hall) cannot be removed even by Diispel Barrier level 3. The one to the north however is level 3. It is hardly worth the trouble because there is ony a chest with an Invulnerability Elixir and a Wand of Alacrity.
In the rooms to the east there is a bit of loot to be foung lying around and in chests.
