 |
| Trapped Halls |
| Avernum 2 | Trapped Halls | Eastern Province |
Navigation: General Hints, Notes
List of all towns and shops in Avernum
 |
| Trapped Halls |
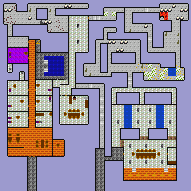
This place is marked as hostile because there are lots of traps and monsters that try to stop you getting in. Once you have got in you find that the only person you can talk to is Sixus himself (and only if you do things correctly).
All the notes say that you must visit the Tower of Sixus first in order to find out where he actually is. I have however come directly here after getting the quest from Bevan in Almaria.
When you arrive you should deposit most of your food at the entrance. There are some statues later on that demand food and will take all that you have. They will however be satisfied with a single portion. So keep enough for thier hunger and leave the rest at the entrance to be picked up later. Go east into the entry hall in the east of which is a small storeroom with some robes and boots. On the one of the bookshelves is a scroll Spray Acid.
There are three paths leading north from the entry hall, all blocked. To unblock them you must operate the controls in the depression to the south. There are six levers all pointing to the left:
\ \ \ \ \ \
Pull the 1st, 2nd, 4th and 5th (counting from the left) to look like this:
/ / \ / / \
The barriers are now down and you can take any of the paths north. At the end of each are three giants guarding a secret door. I usually cast Beast Ceremony before embarking on the journey north and split my party between the paths. This way I can kill the giants quicker.
All ways come together and lead to a warren of tunnels to the north with assorted relatively low level monsters (undead, Spore Beasts, Cave Slimes, Viscous Goo etc.). Although there is no treasure in these tunnels I clear them all of monsters because it gives me more XP. If you want to get through with a minimum of hastle then go N, E, N, W, N, W and N upto the north wall of the cave, then through a secret door in the NW corner. Here you come across the two hungry statues which devour all your food.
Before going through the door to the west you should prepare yourself for battle (e.g. Battle Rage) because there are two drakes in the next room. After killing them you could look in there nests where Healing Herbs and Strange Meat can be found. If your spell points are low you can go outside to rest by going south to the end of the corridor but NOT through the door to the south. Instead go EAST through a hidden door to a passage which leads over a rune to the cave entrance. After resting you can come back the same way from the entry hall and by the hungry statues to the drake's lair.
Whether you go out to rest or not you have two choices from here:
If you go south and through the door you come into a kitchen. NW is a passage blocked by a magical barrier which can be walked through. On entering the Pool Room behind the barrier a bunch of defenders (3 Null Bugs, 2 Golems, 3 Mages and a Wizard) materialise. It is a hard fight. After disposing of these people go NW and pull the lever in a concealed cranny to remove a section of the wall, revealing Sixus quarters. His room is the second door from the north. If you go in he will comit suicide. (You have after all killed all his helpers!) Still, you have completed the mission and can loot the place and read the spell tome in the SE corner.
There is however a possibility to prevent this sensless carnage. Instead of barging through the front door and setting of the alarms one could try to creep in by stealth and convince the denizens of these halls that you come in peace.
To the north of the west wall of the lizards lair are some weak looking places that can be broken down by Move Mountains revealing four hydras. After killing them, there are two ways on, one blocked by a boulder (Move Mountains L3) and the other by a stalagmite (MM L2). At the east end of the tunnel to the north is a nest with a Rod of Arcana. Getting rid of one of the obstacles brings you into a chamber with four Ice Hydras and an Ur-Basilisk. There is not much loot here (some lizard haunches and a cavewood crossbow in one of the nests.) In the SW corner is another wall which can be broken down revealing a storage room with a few barrels containing food and other goods. Through the door is the main corridor of the sleeping quarters.
The first door is Sixus own room. When you open it he will will ask you who sent you. Answer "Bevan" and he will tell you why he went into hiding. With that he summons his assistants and they all disappear by magic. You can look for a concealed chamber to the south and find a chest containing a robe of magi. Now you can explore the rest of his chambers.
Going down the west side of the corridor, the next room has a hidden cranny containing a few coins in the north wall, the next room nothing. Then comes Caleb's room where you can read his journal. After that is the Library. If you walk by the Booksases, you will be told a bit about Quickfire, Fort Dolthar, Garzahd and the three Installations (Kothtar, Lair of Sulfras and Angierach) west of Fort Remote. Going by the wall in the SE corner you get a hint that the wall is weak. MM reveals a Tome which teaches Beast Ceremony L3.
Going Back up the corridor on the east side: in the first room are some Energetic Herbs in a chest. The last room has nothing.
If you feel like it, you can go back to the drake's lair and then south to the kitchen, north to the Pool Room and pull the lever in the NW corner to open up the wall. There is however no loot at all in these rooms, so it is not really worth the effort. The halls can be left by the doors in the south wall of the library or by the passage from the kitchen to the entry hall. Do not forget to pick your food up.
