 |
| Cotra |
| Avernum 2 | Cotra | Eastern Province |
Navigation: General Hints, Notes
List of all towns and shops in Avernum
 |
| Cotra |
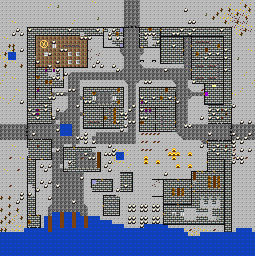
This town has been devastated by an alliance of Empire troops and Eybeasts. Now that they have defeated the Avernites, they seem to have quarreled. The Eyebeasts have occupied the NW and the Empire the smelters in the SE. In the middle between the two parties and to the NE is a variety of different monsters and the SW corner is the domain of some giant slugs.
Before entering the town it is a good idea to get rid of the maraudering bands in the vicinity. There is at least one if not more groups of undead led by an Eyebeast. Such groups are difficult at the best of times, but if you meet one of them when you are tired and wounded just after sacking the town, they can be devastating.
Around the perimeter of the town outside the walls is nothing except a giant slug in the SW corner, that you cannot creep up on. Here you really need Curing L3 (which you should have by this stage).
I like to enter the town from the west and creep down the gangway in the defences to reach the SW corner without being detected. Before breaking into the open I can perform the Beast Ceremony then go through the door to attack the three Giant Slugs that are lurking around. The best way of dealing with these creatures is to send warriors up to them. When somebody is right next to them the cannot spit acid and will merely bite. That is still not nice but is not quite so bad as being covered with acid.
If you are just after the boat in the SW you could take it and leave the town by water. If however you want to clear the town of intruders you should leave the boat for now. There is another Giant Slug skulling around in one of the half demolished buildings towards the middle of the town. After killing it you will find two captains and an aprentice mage which need dealing with. Do not enter the buildings in the SE yet, but head NE towards the east gate. There is only one captain guarding the way to the gate. Now you can go up the gangway in the eastern wall to the NE corner where you will find Yong-Mi. If you talk to her, she will give you some information about the attack and ask you to destroy the Smelters in the SE.
Make sure that you are at full health and well rested and head towards the buildings in the SE of the town. Here are the smelters, which are best attacked from the north. Just inside the east gate are lots of fires, south of which are a single door in the western arm of the building, a single locked door in the eastern wall and double doors in the middle. The door to the west is probably best. Prepare yourself for a big battle and barge straight through this door.
Here you find an evil priest, a captain, an elite soldier, an archer and three ordinary soldiers. As in all battles it is better to concentrate on the spell casters. Now go through the door to the east. (The southern door leads to a rather difficult part of the foundry.) Now you are in the mess where a mage, a captain, two soldiers and an archer are having a meal. After dealing with them you can now go to the door in the south of the eastern room and make sure that you are healthy, have enough spell points and are ready for another battle.
Through this door you find an evil high priest, a lot of elite soldiers, captains and archers. If you are quick enough, you can send a warrior up to the high priest. (That is the reason I suggested this door – the other two doors are to far away from him.) Now pummel the enemy to smithereens. When you get near one of the smelters you will be asked if you want to damage it. Do this (even in ccombat mode). There are four smelters to be destroyed in here. When you have done so you can go back to Yong-Mi to collect your reward: 10 xp and 1 rep.
The troops in the foundry drop a lot of good items, in particular a Warrior's Ring. In the chest in the makeshift barrack to the NE you can find some paperwork which confirms the suspicion of Faye in Fort Duvno about the Empire base on the island to the south.
In the middle of the town is a giant lizard. There are three giant slugs in the building in the NE corner of the town and to the west of this a single slug. Just north of the east gate is an apparently empty icy crypt with a locked door. As soon as you step over the threshold a Vampire emerges out of the tomb. He drops a gold necklace but there is no other loot there or, by the way, in any of the crates or barrels scattered around the town. Looters seem to have taken everthing worth having. Even the corpses have been stripped.
The eyebeasts have barricaded themselves with magical barriers into the northwest corner of the town. I have not tried a piercing crystal here as I have always already got Dispel Barriers before attempting Cotra. There are three ways of getting in: the NE corner just west of the north gate, the southern end just north of the west gate or from the centre of the town. Whichever way you choose there are lots of eyebeasts and undead.
In the middle of the southern barrier is an Eyebeast which can only be disposed of with ranged attacks (e.g. Bolt of Fire, Arrows) until you can get near enough to dispel the barriers, behind which are five Ghasts (Quick and normal). Further west are two Wights. Now up the corridor in the west, north to thier lair, where four Eyebeasts are standing on the dais. There are lots of wights around and a further Eyebeast in a room to the south. The eyebeasts are particularly difficult opponents because they have lots of nasty magical powers. They can paralyse, slow and dumbfound. So it is better to send in a warrior (Divine Warrior is a help here) and keep your spellcasters hidden, so that they can heal, hasten and unshackle mind.
If you choose this route, it is a bit more difficult to cast Beast Ceremony because you are in sight of monsters for a great distance before reaching the barrier. There is however one advantage: the ghasts cannot get through the barrier, so that you can pepper them with Repel Spirit before taking the barrier down and rushing in to remove the Eyebeast by the southern barrier. A further problem with this route is that you will probably spend so long in the free area between the barriers that the two spirits in the room to the east can come out and attack you from behind. As an alternative to the gangway in the west you could go through the door to the room with the tome and kill the single Eyebeast befor going north to deal with the four on the dais.
This is my favourite route. I move up near the northern barrier, enter combat mode, haste and destroy the barrier. I then run up to the northern gangway, killing any wights that come nosing around but avoiding getting in sight of the Eyebeasts. Then westwards along the gangway. Once round the corner I can perform the Beast Ceremony, cast Divine Warrior if I have it and send my warriors into the Eyebeast's lair to pummel them to death. My spellcasters stay in the gangway and keep my warriors healthy and active, killing off the wights as they may. When the Eyebeasts on the podium have been disposed of, I send my warriors south to deal with the one guarding the tome and then out ito the open space with the five ghasts and the Eyebeast manning the barrier to the south. After that it is just a matter of cleaning up any remaining wights and the two spirits in the room to the east.
Whichever route you take you can have a look around after killing all Eyebeasts and undead. There is actually almost no loot. I found only some spritual herbs and a Steel Halberd. There is however a tome in the room to the south of the Eyebeast's Lair which teaches Smite L3.
