 |
|
Lakes/Slithzerikai |
| hostile |
Navigation: General Hints, Notes
List of all towns and shops in Avernum
 |
| Slith Fort |
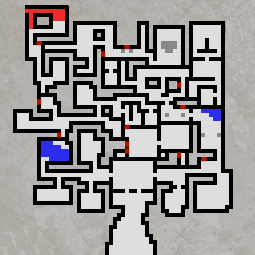
This is a rather complicated dungeon with many hidden passages and doors. It can be difficult to get arround. As soon as you get in you encounter a group of Slithzerikai (a mage, a shaman, 2 Warriors and 3 Sliths). They drop nothing interesting. The main way is to the east but it is worth first looking to the west, where you will find a a few sliths and a bit of loot.
Going east from the entrance you find a small room to the south with nothing in it but three Inferno Wryms and a shovel. In the SE corner are a few sliths and a chest with a note in it that mentions a key. Further north past a trap (TU 7) you come to a dropped portcullis. To get past it you first need to go through a small summoning chamber just south of the portcullis where a Slith Warrior, two Frenzied Apprentices and a Slith Mage have summoned a Frenzied Infernal. There are two hidden entrances into this chamber, one in the NW, and a another in the south (needs Dispel Barriers). These monsters drop almost nothing.
Through the door to the west you come to a small dormitory. There are two corpses and three buttons in this room. If you search around you can find a way out in the NW which leads deeper into the fort.
Round the corner to the north then east through these passages is a locked door behind which are some Writhing Masses in a small room. There are a few scrolls there. Going back to the west is a door leading to a barrier (L1) protecting the rest of the fort from a Mung Demon which drops a Battle Crystal. There is not very much in this direction so back west.
The only possibility now is to search for secret passages in the NW. You must fight lots of slimes, which come in various flavours and find lots of buttons. Just SE of the lava river in the NW corner is a barrier (L1) behind which you can find a Flawless Crystal. Searching around, you should be able to find a route which brings you to the other side of the locked portcullis. At last you are getting to the place, where things happen here.
In the hidden lab everybody seems to be fighting everybody but they all stop when you appear and attack you. You come across Chief Tivn'Schah, Darkcaller Nuassa, a Slith Warior, a Runewarded Infernal and a Slith Warrior. They drop some nice things like a Yvoss-tai Warspear and a pair of radiant Gauntlets. When you have dispached them, you find two barriers (L3 to the west and L2 east). To the west are a Runeward Demon, a Runeward PyroDemon and a Runeward CryoDemon. They drop nothing but were guarding a chest containing some goodies like a pot of Greymould Salve, an Invulnerability Potion and some coins. To the east are two Cave Demons and a Fiery Demon. They are guarding a tome which teaches Mass curing L3.
In the calling room is a blue chest where you can find an Onyx Key. To the south is a locked room with desk and a chest containing a few items..
There are so many buttons in this dungeon that I have divided them into different groups.
