 |
| The Totem Tunnels |
| Avernum 2 | Magi/Honeycomb | |
Navigation: General Hints, Notes
List of all towns and shops in Avernum
 |
| The Totem Tunnels |
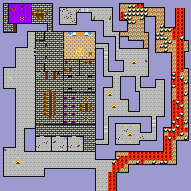
A few people have hinted that there is a grey pass here, even the Avernum patrols in the area have noticed thet there is an enemy outpost hidden somewhere near. These tunnels are best approached over the lava field between Almaria and the Tower of Magi from the west, where you can walk on the lava spaces with rubble on them without getting injured. When you get through the hidden door into the Steam Cavern you will see a rather bleak landscape with some patches of lava. If you wander around, bands of empire soldiers will spring out of hiding and attack you. There are about four of these groups which you should kill off before entering the tunnels. After you have dealt with the garrison inside, these parties will be too scared to attack you and will just turn tail and run when they see you.
After getting some XP and quite a lot of loot from these patrols you can enter the Tunnels by going directly north from the blank obelisk.
When you get inside it is a good idea to go west and get rid of three soldiers and an archer that are camping around a fire in the SW corner. They are best disposed of now otherwise the will only hinder you when you leave. It is no use going further north because you cannot yet get in from the west.
To the east of the entrance is a lava river where there are again lots of rubble patches that can be walked on. Unfortunately you cannot get through the stream without going on some unprotected patches, so Safe Travel L3 or good Pathfinder is useful.
Toward the end of the stream you will be greeted by two fire lizards. Round the corner are two more fire lizards and two drakes. They drop some coins, a few potions (including energy), a scroll and a Clumsy Ring. Now you find yourself on a ledge. The only way on is to jump down. So save the game and make sure that you have enough Spell Points because there will be no turning back once you have jumped down.
After landing you have a chance to prepare yourselves for the battle with some Empire sodiers in the room behind the hidden door to the south. When you have dealt with these annoyances you can go south to an empty Burial Chamber containing lot of (also empty) urns, south of which is a cave with four mutant giants who drop a bit of gold. To the west of the Burial Chamber are some more soldiers, who drop some mediocre equipment and a Ring of Vulnerability
All walkthroughs tell you now to go north and then west into the laboratory. Particularly if I have a weak party wihtout many spell points left, I prefer to go south and then west to the beast pens. When you get to a certain point just west of the centre, the gates to the three pens disappear letting 2 Hydras out of each pen. After getting rid of these pests you should heal yourselves, save the game and prepare for a battle.
On going through the doors to the NW of the beast pens you will find yourselves in a dining hall where a mage, a captain, an elite soldier, an archer and three soldiers are eating. North of the dining hall is the forecourt guarded by two elite soldiers and four archers neatly arrayed in battle order. When you have disposed of these vermin you have two choices. You could explore further, but I prefer to open the gates by turning the wheel in the gateroom in the NW corner. Then I can pass through the gates and go south past the guards I killed before coming in and then out into the Steam Cavern where I can recuperate.
On returning to the tunnels I can now go west and north back up to the main gates which are still open. This is the only town/dungeon in this game where once opened gates or doors stay open when you leave an come back.
Whether you go out to rest or not you should now go north into the Commanders Quarters where there are a mage, a dervish, a captain and two elite soldiers. They drop some good items, including a Ring of Skill and a flask of Hardonnay. There are naturally some Empire records on the bookshelves here. To the west is a locked door leading to the commander's bedroom where the long-awaited Grey Pass can be found in his desk. In the west wall is a hidden door leading to a corridor with two traps (level 17). The locked door at the end opens onto a treasure room with a Balm of Life and a Restoration Brew on the shelf and a chest containing 300 coins, two Bars of Silver and an Assassin's Dagger.
To the east of the forecourt is the lab. where two demons, an evil priest and two captains are waiting for you. They are the reason why I suggested comming up from the south. I find the animals and troops in the dining room a bit easier than these monsters. One of the Crystal Boxes contains some mandrake and there is some greymould lying around and there is some more mandrake in the Vahnatai cabinet.
East of the dining hall is a small hall leading to a barrack in the south and two bedrooms to the north. In the barrack are two archers, an evil priest, a soldier, an assassin and an elite soldier. They do not have anythin particular. On the bookshelves in the bedroom to the NE is an elixir. Behind the locked door to the NW is a bladesman who drops some good equipment including a drakeskin helmet.
The people in the dining hall drop some good items. In the tiny storeroom to th NW of the dining hall is a barrel constining some sugar (just right for Garry)!
Now you have everything, you can go off and sell your loot. Not only have you gained a Grey Pass but you can get a small reward for your good deed at the Merchant Oasis.
