 |
| Lava Dome |
| Avernum 2 | Lava Dome | Eastern Vahnatai Lands |
Navigation: General Hints, Notes
List of all towns and shops in Avernum
 |
| Lava Dome |
This little dungeon is rather fun. The grumpy imp with a fish-phobia is good for a laugh; there are lots of surprises and the puzles are interesting but not too difficult. The only disappointment is that the treasure that Kordaddis had accumulated in Exile 2 has vanished in Avernum 2. (The room is still there but there is no way in!) Still you get the Mica-Tome for Rentar-Ihrno and you can learn Blademaster on your way here or on the return journey.
When you first arrive, this dome seems like a friendly town. Although Goosenargh never turns nasty, she is not exactly friendly. You get attacked at various times by a variety of monsters and must fight your way around to the master of the place and then kill him. All this is not exactly friendly, so I have marked this town as "hostile".
| Person | Function | Items, Quests and Notes | Rating |
| Goosenargh |
Shopkeeper (Weapons) |
An imp that sells cursed weapons. She gives you the necessary information to get to Kordaddis – but only after you have "persuaded" her. |
utterly rediculous |
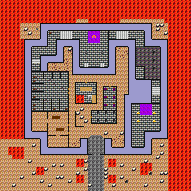
I always like to walk around the outside of any town I visit before entering it. In this case it is dubious whether one should do this at the start. You could negotiate the lava to encounter a Fire Hydra in the NW corner, which is guarding a chest which is apparently empty. In the NE corner is a Demon guarding nothing better than a Horn.
As there are a number of monsters skulling around here, it is better to clear out the corridors and rooms before embarking on the quest of finding the Mica-Tome. In the NE corner are two flame hydras. The door in the SW corner leads into rooms with two Ice Hydras and three Flame Hydras. In one of the nests are a Blessed Dagger and a Wand of Slowing. Just north of these rooms is the Hordling Pit with seven Hordlings. The corpses that are lying in the niches have already been stripped and cause you to get deseased if you search them.
The next stop is Goosenargh, who besides offering you cursed weapons at utterly rediculous prices, will give you a hint that there is a note by one of the bodies in the Hordling Pit. It is not a good idea to search all the corpses because they are in a state of decay and will desease you. Looking at the northern corpse in SW niche uncovers a note which says "seach the southeast bed". (Actually you can find this note without talking to Goosenargh.)
The bedroom is just east of Goosenargh's shop. Here you will be asked if you want to rest. Save the game first if you decide to take the option to recuperate. On going down between the rows of beds you find the message "Look at the outside wall to the northwest. When you go, walk next to the wall."
Now you can go round the outside of the building (again). On looking inside the box in the NW corner you can now find a slip of paper bearing five words: "Blow Horn Between East Pillars". So you need a horn! If you have not found one yet Goosenargh will sell you one for a mere 1000 coins!
On entering the room with the pillars in the south you will trigger an ambush by two Hordlings, two Demons and a Flame Hydra. Blowing the horn between the eastern pillars causes the words "Goosenargh hates the word 'fish'" to appear briefly. Now back to the shop where you can bombard Goosenargh with the word "fish" until she tells you how to get to Kordaddis.
Now you can find the stone which must be moved to get into the secret passage. Going north and east you come to a small temple. Turning the wheel in the south opens the wall in the east, but causes a Mung Demon and two Demons to appear. Going east and then north you come to a room with a tiled floor. Do not tread on any of the small tiles with a circle on them otherwise you will be transported to a dirty ledge in NE of the main part of the town.
You need to go through a secret door into a small chamber directly south of the entrance. Then back out into the tiled hall and through a further hidden door in the SE corner of this hall, then up the stairs and through the next wall into the Throne Room which is at present empty.
When you get near the Bookshelves in the SW corner, the master of this place appears as a Haakai accompanied by some henchmen (a Basilisk and two Flame Hydras). In anticipation of trouble I like to prepare my party by hasting, blessing and whatever, enter combat mode, send my warrios up towards the throne and then move a spell caster to the south.
After killing these monsters you can pick up the Mica-Tome from the bookshelves. There is no treasure at all here. Although the treasure room just north of the throne exists, it cannot be entered. I have not shown it on the map here but it is can be made visable with Far Sight.
If you go back and tell Goosenargh that you have killed her master she will flee, leaving some cursed weapons on the counter if you want them!
There is no inn in this town and if you decide to rest in the bedroom you will die.
