 |
 |
 |
 |
| Gardian Plains | Ornotha Ziggurat | upper level | escape route |
| Avernum 2 | Ornotha Ziggurat | Special Routes/Teleporter |
Navigation: General Hints, Notes
List of all towns and shops in Avernum
 |
 |
 |
 |
| Gardian Plains | Ornotha Ziggurat | upper level | escape route |
This is a complex fortification where lots of treasure can be found but the main purpose of coming here is of course to rescue Caffren-Bok.
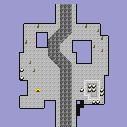
Before you can get here you must have got the orders from Olgai for Fort Haledon and have come through the Barrier Tunnel. When you come out of the hidden passage just outside the Barrier Tunnel you find yourself deep in Empire controlled territory where you can easily run into many enemy patrols.
On reaching the Guardian Plains you find the Vahnatai vanguard already in a big fight with many Empire elite sodiers, priests, mages, at least one wizard and leading them all Garzahd himself. It goes without saying that you should cast Beast Ceremony before entering this part of the defences. It is best to send "Devine Warriored" fighters up front to deal with wizards and to pummel Garzahd.
After injuring Garzahd enough he just disappears in a puff of smoke – it was not really him, just an illusion. I like to kill off all the enemy soldiers here, but you could just try to sneak through to the north and leave the Vahnatai to be slaughtered alone. By the way: when fighting with allies Mass Healing and Haste L3 work on all characters on your side.
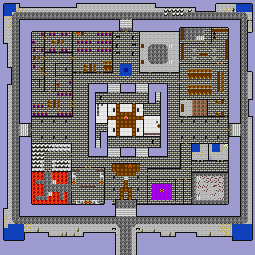
It is worth circling the inner building. There is a pool in the SE corner and potion ingedients in the other corners, guarded by a Spawned Fungus in the NW and NE, where there is also a locked room containing an energy potion. There are four doors to the main area which is divided into four corner blocks and a central area leading to the upper floor.
You could barge in through the main doors in the south and be greeted by a stong contingent of guards (2 elite sodiers, 5 infiltrators and a dervish). It is a bit better to use one of the other doors (which one is immaterial). There are guards in all of the corridors, but it is a bit easier if you can creep up on the large group in front of the main door.
In the SW block is a foundary with very little of interest. In the SE are three holding cells and a rubbish pit. In cell No 1 is a Rakshasa. In Cells 2 and 3 are four Spawned Fungi (very dangerous). In the rubbish pit there are 6 Spawned Fungi, a Shambler and a Giant Slug! Except for the rubbish pit where a body yields an Energy Elixir, a Healing Elixir and a Wand of Fire none of these monsters is guarding any worthwhile loot.
In the NE block is a dining room where a Vahnatai Keeper, two Elite Soldiers and a number of Infiltrators are sitting. They drop some good equipment. South of the dining room is a herb garden which yields some potion ingredients and a small office with with a chest containing some gold. In the training area to the west are two archers and a bladesman. The Kitchen and cellar to the north yield nothing but a little food.
The most interesting part of the ground floor is the NW block. The eastern wing of this block is a barracks where an archer and four infiltrators ar resting. In the south is another large dormitory with a few soldiers. Between the two is a corridor with a number of smaller rooms leading off, some occupied and some not. When you have cleard them out you will notice two unexplored areas. The western one is entered from the north, has two traps (level 16) and leads to a chest contaning Greymould Salve and two Haste Elixirs. The area to the east is entered from the south, is full of quickfire, also has two level 16 traps and boasts a chest contaning the Ghoulbane.
Whether you enter from the north or the south you find three Priests, lots of Fungoids and various soldiers. After finishing off these opponents you can pick up the knife on the alter. Do not do this even if prompted to do so before all enemies are dead because doing so causes all of your party to be dumbfounded. You will need an unshackling crystal or a restoration brew to cure your priest. Sanctifying the altar brings 10 xp. I usually get my prist to perform the ritual after picking up the knife. Then he can then drink the restoration brew thereby restoring the lost health points at the same time as curing the dumbfounding.
To the west is a locked robing room with a few goodies and to the east a locked storeroom which is empty except for a chest containing a few uninteresting items. There are staicases to the upper story in the NE und SW corners of this shrine.
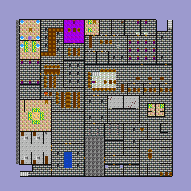
There are lots of goodies, some surprises like Torture Runes and naturally many hostile soldiers (not to mention a few monsters) on the first floor. There are two strategies here: you can fight your way through an pick up everything that could be useful, or you can go straight for the Crystal Soul.
The NE staircase leads to the northeast corner of the upper floor. After going south you come through a door onto a practice room for spies where a Rouge Mage and some Infiltrators will attack you. To the north of this room is a door leading to a dormitory. Further north are two rooms. You could rest in the western one but this does not help very much because the monsters have time to regenerate while you are recovering. In the north wall of the practice room in a hidden door leading to some empty proson cells. In the NW corner of this cell block is a locked door to a room with a Vahnatai Cabinet containig a Poison Potion and an ordinary crystal. On the floor are two Torture Runes.
Actually there is nothing interesting to the north of the practice room. The south is another matter. In the SE are three little rooms – all empty. In the eastern one is a secret door leading to a room a closed block on the W and E sides of which are further hidden doors each leading to a chair. The W chair adds one to Strength and the western one gives point of Dexterity but in each case the Character looses 100 xp. It is up to you if you think the price is worth it. (I always let one of my warriors and my archer up their points.) But whatever you do here be careful not to step on the Torture Rune to the south.
If you want to, you could make a short diversion by going into the library to the south of the magic chairs. Here are three Mages and a Wizard, so prepare yourself well. On the shelves I only found one scroll and one set of Empire Records. The mages and the Wizard do not drop anything interesting. The whole purpose of this excusion was to go into the hidden reading room. Both pictures on the west wall hide secret doors. Take the northern one, destoy the magic barrier and go north into the small library. The shelves only have some scrolls but the tome will teach you Fireblast L3 if you can break the seal with the Blessed Athame. Now back to the NE corner of this level.
Through the double doors to the SW of the practice romm are a few Empire soldiers in a pillared hall. After killing them do not go south but go up to the north end of the west wall, save the game, prepare for a big battle and go through the wall into the large Guardroom where you can fight your way through to the Crystal Soul.
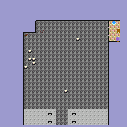
I'll write up this part of the dungeon later!
In the southern part of this large Guardroom are lots of baldesmen, infiltrators and other Empire soldiers. Sitting at the tables to the north are an Evil High Priest and a Wizard. Send up at least one warrior to deal with them (hasted, belessed and otherwise augmented e.g. Devine Warrior, Heroic Brew, Inner Might, Go Bezerk or what have you). As soon as you have disposed of these annoyances you can go through the wall in the NE corner into another pillared hall and then north into a small antechamber where two Dervishes are waitng for you.
Having killed them you can enter the archmage's bedromm. There are two trapped dressers (level 14). The west one contains nothing but the eastern one yields Energy and Resistance Elixirs. Then through the wall to the west. This room has a nice carpet to show you the way to the next hidden door. But be careful: the barrier which is contaning the quickfire to the north will break as soon as you start walking south. The best way to deal with this, is to haste the party, enter combat mode, run south and follow the carpet to escape through the wall to the SW. Oops! Here are four Vahnavois (actually not very difficult). Now it is just a case of going north to the Chamber of the Crystal Soul.
