 |
| Gremlin Cave |
| Avernum 1 | Gremlin Cave | Lakes/Slithzerikai |
Navigation: General Hints, Notes
List of all towns and shops in Avernum
 |
| Gremlin Cave |
This is a tricky cave. Firstly there are lots of Gremlins which shoot Shimmering Rays that can confuse you (Unshackle Mind cures it). Secondly there are lots of hidden passages and teleporters that sometimes transport you to different destinations depending on which runes you have touched and how many times you have touched them. Thirdly there are some Empire soldiers, mages and priests, not to mention two demons.
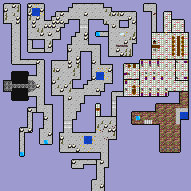
The first bit is relatively straight forward: just eliminate all gremlins. Then you have to find a hidden passage in the west wall of the cave as far to the NE you can go, which leads to a teleporter that sends you into the empire barracks.
You arrive in a corridor leading into the barracks. Behind the door are a witch, some soldiers and a captain. The door to the south leads to room with some tougher enemies – a wizard who is immune to magic, a priest, a mage, a high priest und lots of different soldiers. Beast Ceremony helps a lot if you have it. Concentrate on the wizard and other spell casters.
After killing off all the Empire enemies you can pick up the dropped items including an Armour Ring. If you search around in the various rooms you will find a lot of useful items including some potion making ingredients.
In the bedroom to the SW of the barracks is a hidden passage which leads to the ledge you can see to the NE of the entrance. In the NW corner of the ledge is a a tome hidden behind a secret door. Reading the tome teaches Lightning Spray L3.
In the SE corner of the barracks is a secret passage with a guard on the other side. After killing him you come to a storeroom with some good items, coins, a Blessed Spear and a Cursed Spear. If you walk into the teleporter to the west you will be transported back to the entrance corridor to the barracks.
There is however another secret room to the NE of the barracks. If you touch the rune in the middle of the room the teleporter would take you to the NW corner of the main cave. Touching the rune a second time switches the teleporter to take you to the orb.
There is a further secret passage in the NW of the barracks leading to (or from) a ledge which I have never been able to reach.
You land the NW corner of the dungeon. To the south (after jumping down a ledge) you come to two runes and a bridge. Over the bridge is a pedestal with the orb upon it. You will be asked what you want to do. The only sensible answer is to smash it, which causes demons to appear on the runes. Since the orb is breakable in combat mode it is a good idea to cast Beast Ceremony/Haste, enter combat mode, place your warriors near the runes and then send a spell caster to smash the orb. This way you can despatch the demons before they can call up too many nasty monsters or do too much damage.
Now you have completed the task you can leave the caves and collect your reward (join the Scimitar). But how?
To the south is a teleporter which just takes you back to the NW so that you have to jump of the ledge to get back to the runes and bridge. In the west wall south of the runes is a further secret passage which leads to a teleporter that takes you back to the barracks.
The teleporter to the south just takes you back to the orb. You now have two options if you want to leave. You can take the secret passage in the SW bedroom and jump off the ledge taking some damage. Alternatively you can touch the rune in the NE twice more, so that the teleporter takes you to the NW corner of the main cave.
