 |
| Final Gauntlet |
| Avernum 1 | The Final Gauntlet | Great Cave |
Navigation: General Hints, Notes
List of all towns and shops in Avernum
 |
| Final Gauntlet |
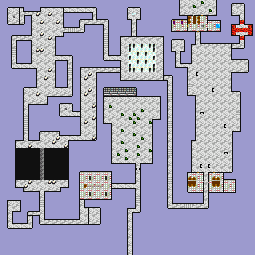
To get through this dungeon you must have got the four parts of the password from Erika, Patrick, Aimee and Athron. With the exception of one trap (which however yields a lot of treasure) the dungeon is relatively straight forward, mainly lots of fighting with guardians, giants then golems and finally fetid zombies. After you have got part of the way through your escape route gets cut off. Not to worry, even if you have not got many potions: you can find lots of Healing and Energy Elixirs.
As soon as you enter the tunnel you find a long passage leading directly north to a beautiful green meadow, where the sun is shining. At last you have found the exit to the surface. After all the fuss it is a bit of an anticlimax – much to easy! That is right. It is a trap! As soon as you get onto the meadow the gates snap behind you and lots of giants appear. They drop a lot of silver bars and gold, however, when you kill them.
Behind a hidden door in the middle of the north wall is a wheel guarded by some golems. Turning this wheel reopens the gate so that you can get back out again.
To the east is a passage with a hidden door at the end of it leading to the first Barrier Chamber. You will be asked for the password, which you (hopefully) have and also be told to perform the Ritual of Safety, which you cannot. Oh well! Just press on and hope for the best!
In the south wall is another secret door which leads to a passage running south then east and then north to a bridge which, if you try to cross, plummets you to your death.
In the SW corner is a wheel which, when turned, stabilises the bridge but also releases a number of guardians from a secret room to the west. When you have got rid of these nasty cratures you can pick up some Energy and Healing Elixirs in their hidyhole. Now north to the bridge.
The bridge is still rather rickety but you manage to cross it, only to find that it collapses behind you cutting off your route of escape. The path to the NE leads to a sheer wall which you cannot climb. To the NW is a ramp leading up to a series of ledges connected by ramps. There are giants on each of the ledges and a giant shaman at the top. Since the passages with the ramps leading from one level to the next are hidden from the ledges themselves, you can cast Beast Ceremony as often as necessary. On the top level in the west wall is a secret door leading to a chest containing 1 Energy and 2 Healing Elixirs.
Heading east and then south you climb another ramp and turn east again to come into a chamber with lots of barriers surounding 6 giants guarding a wheel. There are also two Black Shades (invisible spell casters), one in the NE, the other in the SE corner. It is best to cast Beast Ceremony just before entering this chamber. Send your warriors directly to the corners with the Black Shades before they can do too much damage or call up too many monsters. While your warriors are fighting the shades, your spell casters can pepper any summoned beasts and also the giants, which are trapped in by the barriers and pillars. When you have eliminated the shades you can position your warriors near the barriers (you can even walk through some of them) and then cast Dispel Barriers. Now you can dispose of the giants and any remaining barriers. Do not however turn the wheel yet.
Search the west wall just south of the entrance for a secret passage leading to a series of high ledges you could jump down from thereby taking considerable damage. There is however a further secret passage in the north wall of the Barrier Chamber leading to a pool which makes you feather light when you drink from it. The effects wear off rather quickly. That is why I suggested finding the secret passage to the ledges first. Now time is of the esscence. Enter combat mode, haste and move your party to the edge of the first ledge. You must leave combat mode to jump down. Jump down the second and third ledge and when you reach the penultimate ledge (only one small drop visible) enter combat mode again to search the west wall for a secret room with a chest in the middle. This chest, which can only be searched in town mode, contains 3 Energy and 4 Healing Elixirs. Then in combat mode back to the ledge. By alternating between combat and town mode you can negotiate your way back to the bottom.
You can now go back up the series of ramps and ledges picking up the coins and other loot dropped by the giants, until you come back to the second Barrier Chamber. Now you can turn the wheel which makes a secret door appear(?) in the SE corner.
The passage leads south, east and then north to a cavern full of stalagmites. As soon as you enter this cavern you are plunged into darkness. Shortly before entering the cavern you should cast Beast Ceremony and enter combat mode. Cling to the west wall moving north until you reach a ledge then east to a ramp then back west. The aim is to reach a wheel in the NW corner. You will meet lots of golems on the way. They are best dealt with by brute force. The only spell which affects them is Fireblast.
Turn the wheel in the NW corner. Then fight your way back by the same route to the room in the SE killing not only golems on the way but also fetid zombies. There is a hidden door in the east wall of this room with another wheel which should now be turned. The room to the SW is empty. Then fight your way back up to the third level and then to the far NE corner, over two lava rivers, where you find the third wheel to turn. Now back to the south. Just north of the entrance is the fourth wheel.
Having turned all four wheels in the correct order, you can head back to the third level. Slightly NE of the first wheel is a passage, which is a bit difficult to find because it is obscured by stalagmites. When you reach this passage the light returns.
At the end of the passage is the door to the Surface Safehouse. To the west is a room where you can rest for a few hours. To the north is the Exit to the Surface. If you go through the door you will be congratulated and asked, if you want to leave or stay in Avernum. Choosing the former finishes the game. If you wish to stay you can use the portal in the east to return to the entrance to the cave.
Having found the exit you can report back to Erika and get your reward. You can also tell the Scimitar about your success but will get no further reward.
